更新日志
最新更新和公告。
August 2024 - npx shadcn init
新的 CLI 现已推出!这是一个完整的重写,有很多新功能和改进;您现在可以使用“npx shadcn add”安装组件、主题、挂钩、实用程序等。
这是朝着分发您和您的法学硕士可以访问和使用的代码迈出的重要一步。
- 首先,cli 现在支持所有主要的 React 框架。 Next.js、Remix、Vite 和 Laravel。当您启动新应用程序时,我们会更新您现有的 Tailwind 文件而不是覆盖。
- 组件现在提供自己的依赖项。以手风琴为例,它可以定义其 Tailwind 关键帧。当您将其添加到项目中时,我们将相应地更新您的 tailwind.config.ts 文件。
- 您还可以使用url安装远程组件。
npx shadcn 添加 https://acme.com/registry/navbar.json。 - 我们还改进了init命令。它可以进行框架检测,甚至可以通过一个命令启动一个全新的 Next.js 应用程序。
npx shadcn 初始化。 - 我们创建了一个新架构,您可以使用它来发布您自己的组件注册表。由于它支持 url,您甚至可以使用它来分发私有组件。
- 还有一些更新,例如更好的错误处理和 monorepo 支持。
现在可以尝试新的 cli 了!
pnpm dlx shadcn init sidebar-01 login-01
Update Your Project
To update an existing project to use the new CLI, update your components.json file to include import aliases for your components, utils, ui, lib and hooks.
{
  "$schema": "https://ui.shadcn.com/schema.json",
  "style": "new-york",
  "tailwind": {
    // ...
  },
  "aliases": {
    "components": "@/components",
    "utils": "@/lib/utils",
    "ui": "@/components/ui",
    "lib": "@/lib",
    "hooks": "@/hooks"
  }
}If you're using a different import alias prefix eg ~, replace @ with your prefix.
April 2024 - Introducing Lift Mode
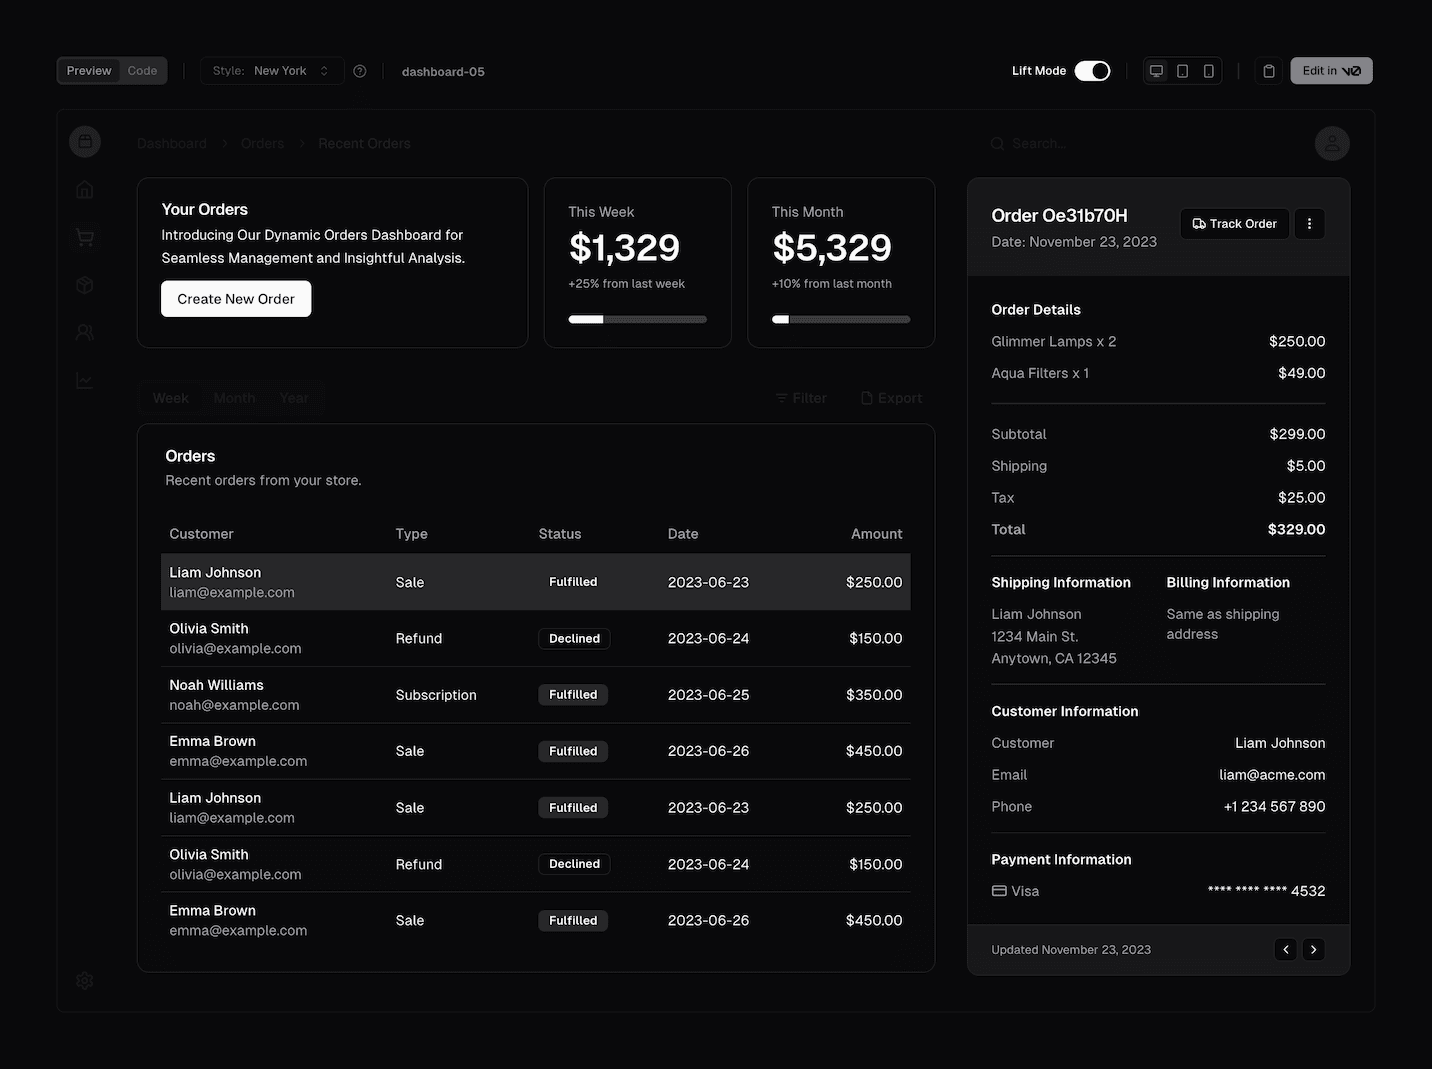
我们为 Blocks 引入了一种新模式,称为 Lift Mode。
启用 Lift Mode 可以自动从块模板中“lift”较小的组件以进行复制和粘贴。
 查看 blocks 库
使用 Lift Mode,您将能够复制构成块模板的较小组件,如卡片、按钮和表单,并直接将它们粘贴到您的项目中。
访问 Blocks 页面尝试它。
2024 年 3 月 - 引入 Blocks
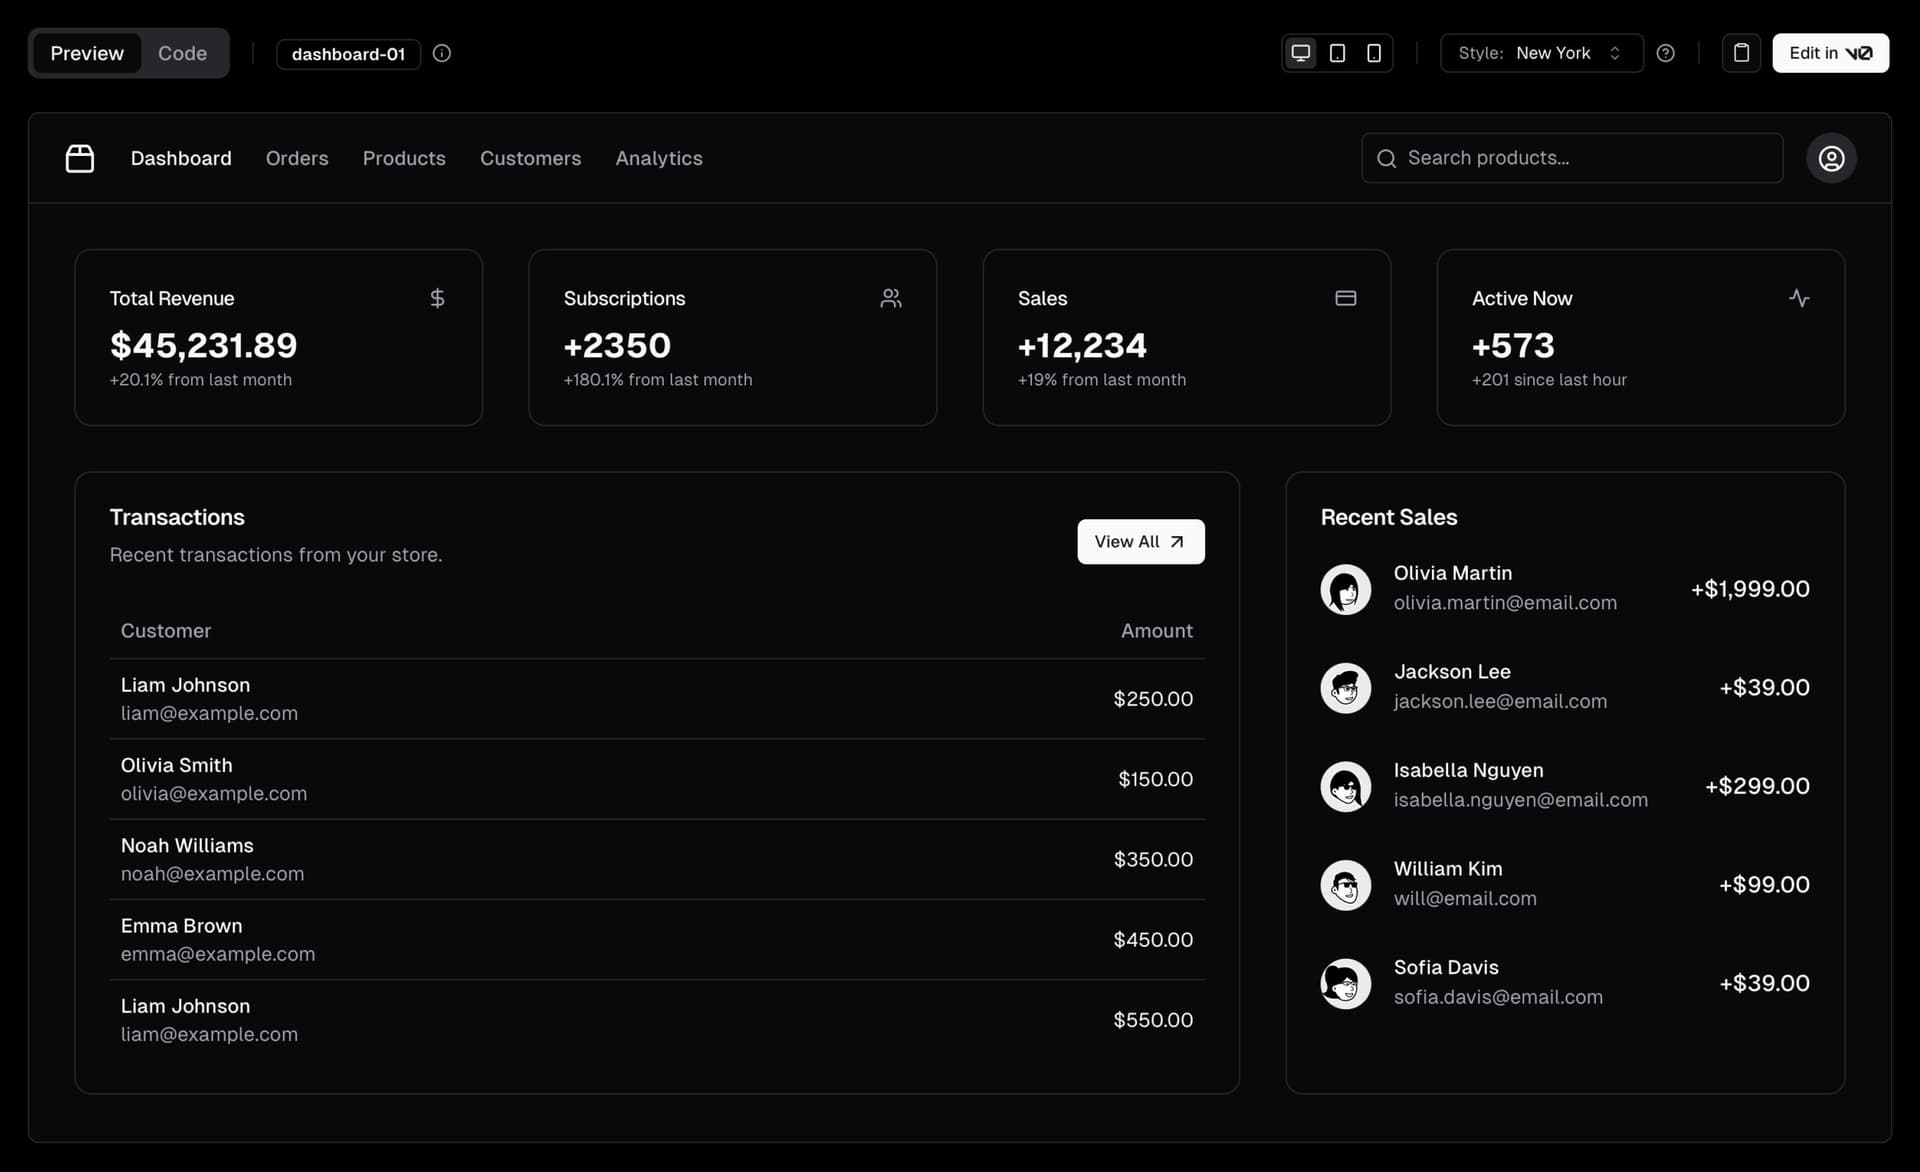
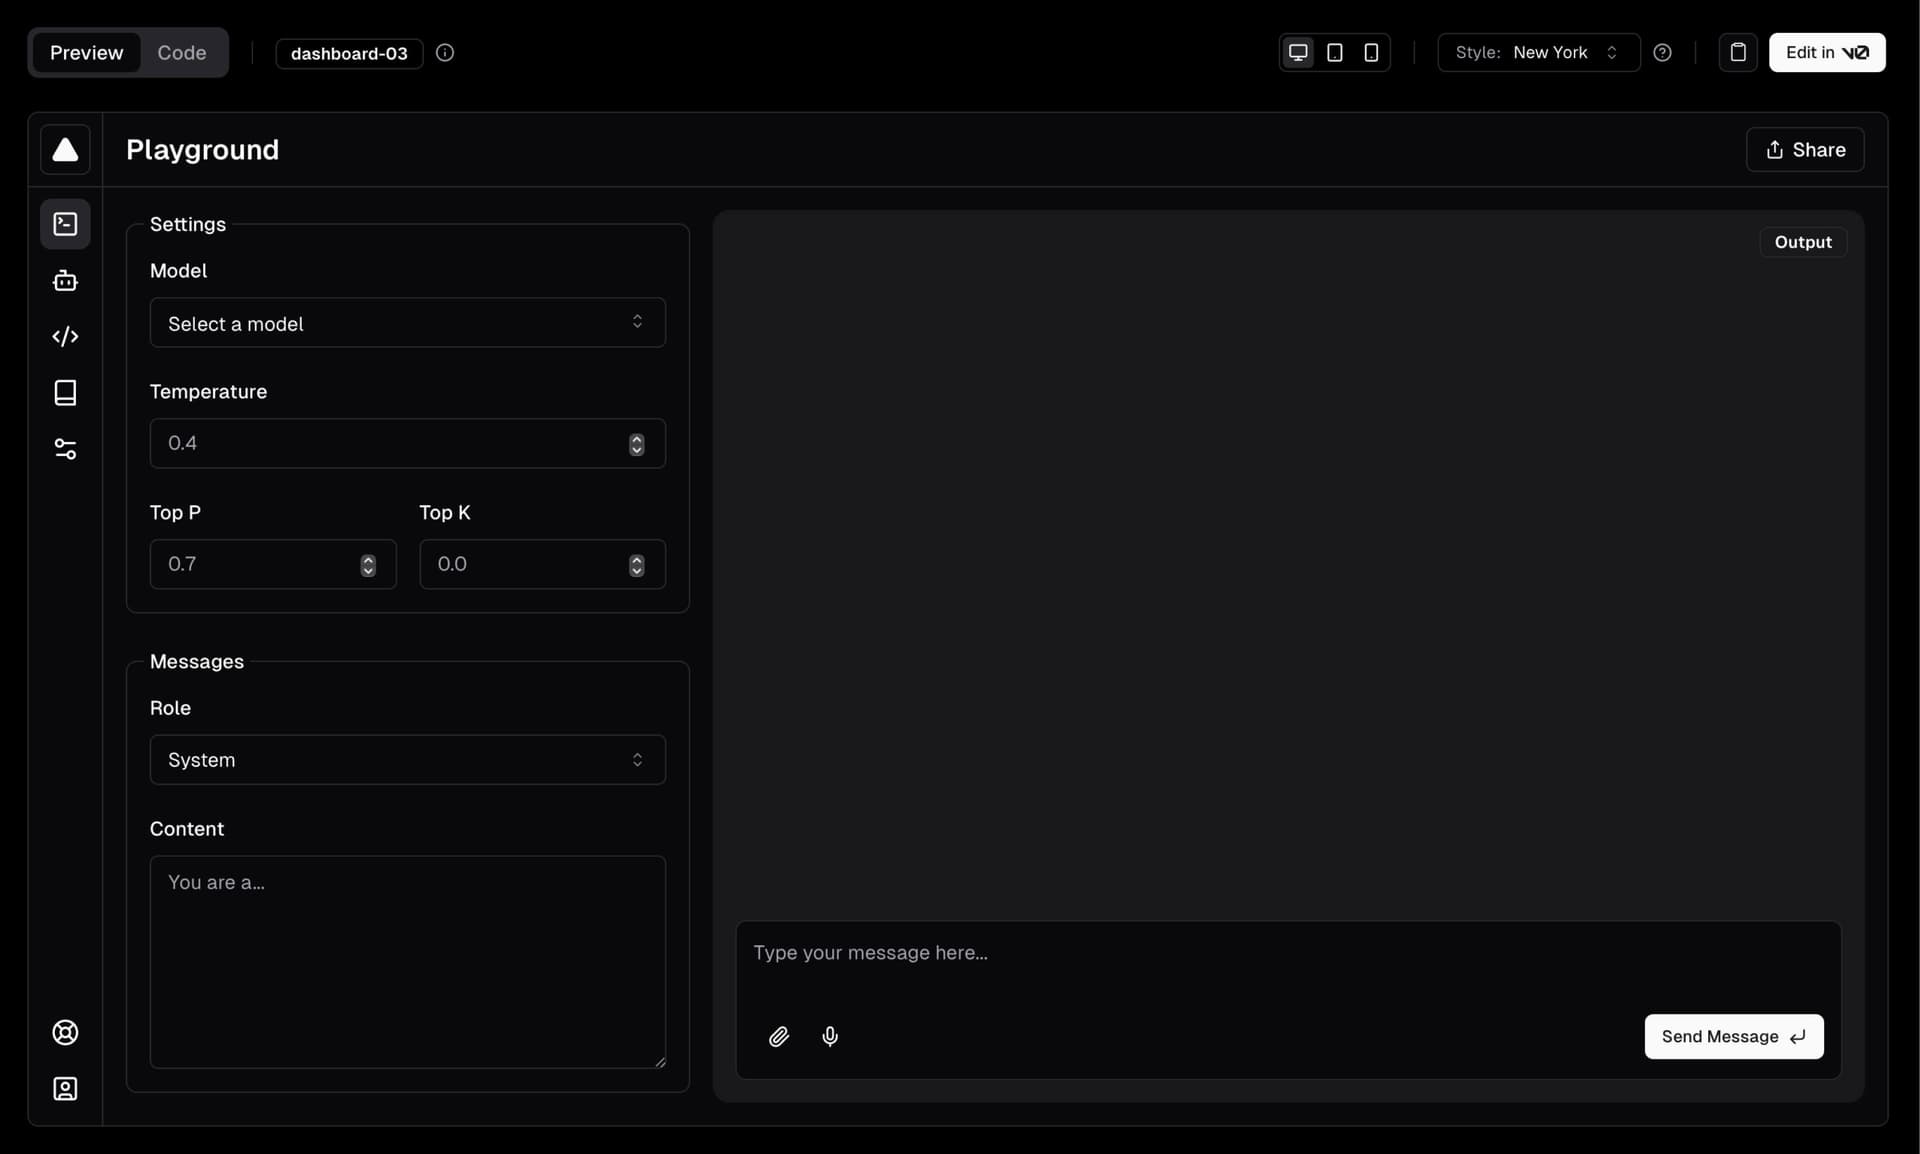
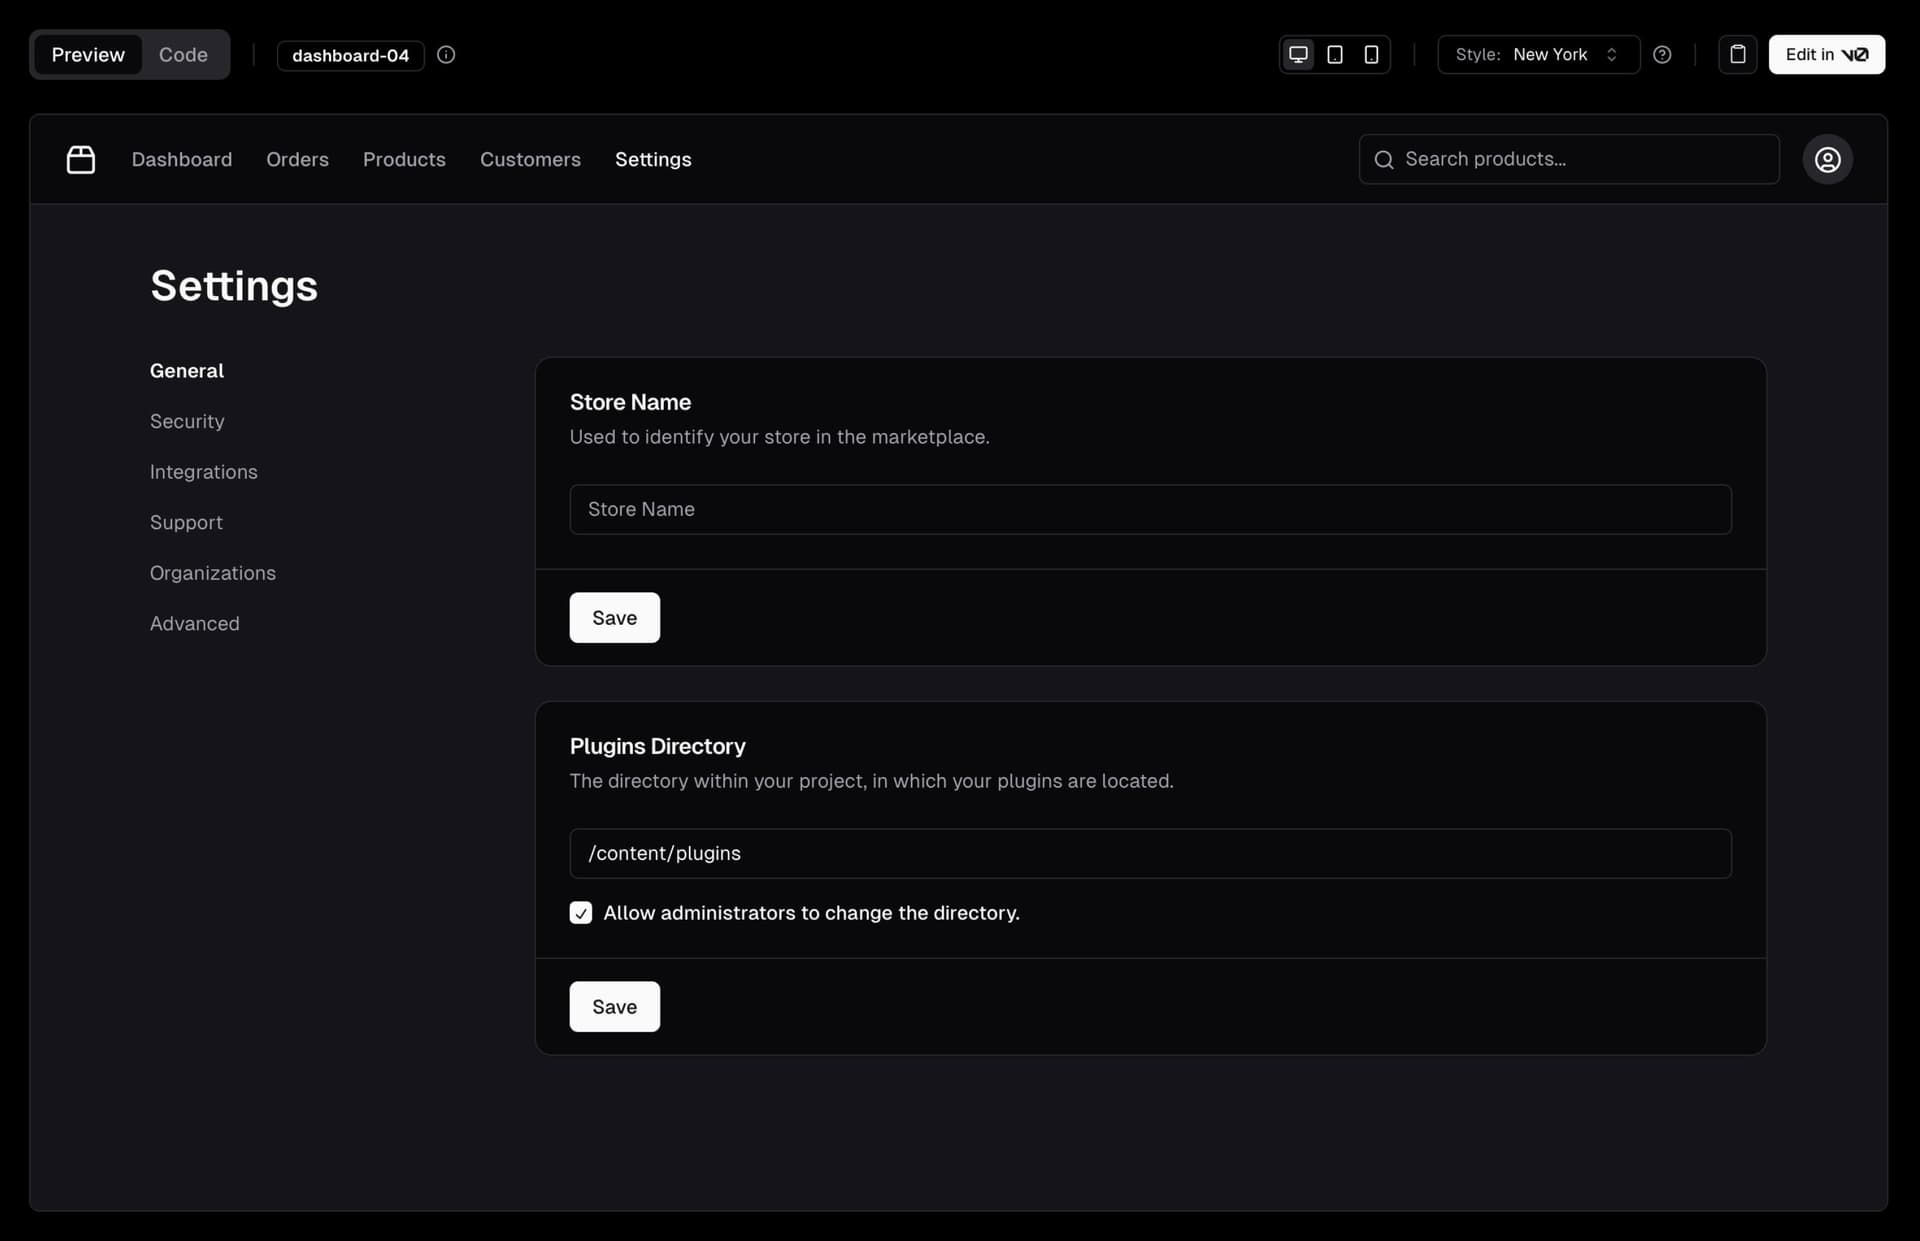
自推出以来最受请求的功能之一是布局:带有侧边栏的管理仪表板、营销页面部分、卡片等。
今天,我们推出了Blocks。
 查看 blocks 库
Blocks 是您可以使用的现成组件,用于构建您的应用程序。它们是完全响应式、可访问和可组合的,意味着它们是使用与 shadcn/ui 中其他组件相同的原则构建的。
我们从仪表板布局和认证页面开始,计划在未来几周内添加更多块。
开源
Blocks 是开源的。您可以在 GitHub 上找到源代码。在您的项目中使用它们,自定义它们并贡献回去。
 View the blocks library
请求一个 Block
我们还引入了一个“Request a Block”的功能。如果您想看到特定的块,只需在 GitHub 上创建一个请求,社区可以投票并构建它。
 View the blocks library
v0
如果您有一个v0账户,您可以使用“在 v0 中编辑”功能打开 v0 中的代码以进行提示和进一步生成。
就是这样。期待看到您使用 Blocks 构建的内容。
2024 年 3 月 - Breadcrumb(面包屑) 和 Input OTP
我们新增了一个面包屑组件和一个输入 OTP 组件。
Breadcrumb(面包屑)
一个易于访问且灵活的面包屑组件。它支持折叠项目、自定义分隔符、自带路由<Link />,并且可以与其他 shadcn/ui 组件组合使用。
Input OTP
一个功能完备的输入 OTP 组件。它支持数字和字母数字代码、自定义长度、复制粘贴和无障碍访问。输入 OTP 是基于input-otp由@guilherme_rodz构建的。
如果您有 v0,新组件可用于生成。
2023 年 12 月 - 新组件、CLI 等
我们为 shadcn/ui 添加了新组件,并对 CLI 进行了许多改进。
以下是新内容的快速概览:
- Carousel - 一个带有运动、滑动手势和键盘支持的 Carousel 组件。
- Drawer - 在移动设备上看起来很棒的抽屉组件。
- Pagination - 一个带有页面导航、上一页和下一页按钮的分页组件。
- Resizable - 用于构建可调整大小的面板组和布局的可调整大小组件。
- Sonner - 您将需要的最后一个提示组件。
- CLI updates - 支持自定义 Tailwind 前缀和
tailwind.config.ts。
Carousel
我们添加了一个功能完备的 carousel 组件,带有运动、滑动手势和键盘支持。构建在 Embla Carousel 之上。 它支持无限循环、自动播放、垂直方向等。
Drawer (抽屉)
抽屉组件😍. 基于Vaul由emilkowalski_构建。
尝试在移动设备上打开以下抽屉。它看起来很棒!
Pagination (分页)
我们添加了一个分页组件,带有页面导航、上一页和下一页按钮。简单、灵活,并且可以与您的框架的 <Link /> 组件一起使用。
Resizable
使用这个 <Resizable /> 组件构建可调整大小的面板组和布局。
<Resizable />是使用 react-resizable-panels 由 bvaughn 构建的。它支持鼠标、触摸和键盘。
Sonner
另一个由emilkowalski_构建的组件。您将需要的最后一个提示组件。Sonner 现在可以在 shadcn/ui 中使用。
CLI 更新
这是最受请求的功能之一。您现在可以配置自定义 Tailwind 前缀,CLI 将在添加组件时自动为您的实用程序类添加前缀。 这意味着您现在可以轻松地将 shadcn/ui 组件添加到现有项目中,如 Docusaurus、Nextra 等。与您现有的设计系统无缝集成,没有冲突。
<AlertDialog className="tw-grid tw-gap-4 tw-border tw-bg-background tw-shadow-lg" />它适用于cn, cva和 CSS variables。
CLI 现在也可以检测 tailwind.config.ts 并为您添加配置的 TypeScript 版本。
就这样。节日快乐。
2023 年 7 月 - JavaScript
这个项目和组件是用 TypeScript 编写的。我们也推荐您在项目中使用 TypeScript。
然而,我们提供了一个通过cli可用的组件的 JavaScript 版本。
Would you like to use TypeScript (recommended)? no要退出 TypeScript,您可以在components.json文件中使用tsx标志。
{
  "style": "default",
  "tailwind": {
    "config": "tailwind.config.js",
    "css": "src/app/globals.css",
    "baseColor": "zinc",
    "cssVariables": true
  },
  "rsc": false,
  "tsx": false,
  "aliases": {
    "utils": "~/lib/utils",
    "components": "~/components"
  }
}要配置导入别名,您可以使用以下jsconfig.json:
{
  "compilerOptions": {
    "paths": {
      "@/*": ["./*"]
    }
  }
}2023 年 6 月 - 新 CLI、样式等
我今天有很多更新要与您分享:
- New CLI - 从头开始重写了 CLI。您现在可以添加组件、依赖项并配置导入路径。
- Theming - 选择使用 CSS 变量或 Tailwind CSS 实用程序类进行主题设置。
- Base color - 为您的项目配置基础颜色。这将用于生成组件的默认颜色调色板。
- React Server Components - 选择不使用 React 服务器组件。CLI 将自动添加或删除
use client指令。 - Styles - 引入了一种称为_Style_的新概念。一个样式带有其自己的组件、动画、图标等。
- Exit animations - 为所有组件添加了退出动画。
- Other updates - 新的
icon按钮大小,更新了sheet组件等。 - Updating your project - 如何更新您的项目以获取最新更改。
新 CLI
过去几周我一直在开发一个新的 CLI。这是一次完整的重写。它带来了许多新功能和改进。
init
pnpm dlx shadcn-ui@latest init
当您运行 init 命令时,系统会询问您几个问题以配置 components.json:
您想使用哪种样式?› 默认
您想使用哪种颜色作为基础颜色?› 板岩
您的全局 CSS 文件在哪里?› › app/globals.css
您想使用 CSS 变量进行颜色设置吗?› 否 / 是
您的 tailwind.config.js 在哪里?› tailwind.config.js
为组件配置导入别名:› @/components
为 utils 配置导入别名:› @/lib/utils
您是否使用 React 服务器组件?› 否 / 是此文件包含有关您的组件的所有信息:在哪里安装它们,导入路径,它们如何被样式化等。
您可以使用此文件更改组件的导入路径,设置基础颜色或更改样式方法。
{
  "style": "default",
  "tailwind": {
    "config": "tailwind.config.ts",
    "css": "src/app/globals.css",
    "baseColor": "zinc",
    "cssVariables": true
  },
  "rsc": false,
  "aliases": {
    "utils": "~/lib/utils",
    "components": "~/components"
  }
}这意味着您现在可以使用 CLI 与任何目录结构,包括src 和 app目录。
add
pnpm dlx shadcn-ui@latest add
add 命令现在更加强大。您现在可以添加 UI 组件,还可以导入更复杂的组件(即将推出)。
CLI 将自动解析所有组件和依赖项,根据您的自定义配置对它们进行格式化,并将它们添加到您的项目中。
diff (experimental)
pnpm dlx shadcn-ui diff
我们还引入了一个新的 diff 命令,以帮助您跟踪上游更新。
您可以使用此命令查看上游仓库中的更改,并相应地更新您的项目。
运行diff 命令以获取可用更新的组件列表:
pnpm dlx shadcn-ui diff
以下组件有可用更新:
- button
  - /path/to/my-app/components/ui/button.tsx
- toast
  - /path/to/my-app/components/ui/use-toast.ts
- /path/to/my-app/components/ui/toaster.tsx然后运行 diff [component] 查看更改:
pnpm dlx shadcn-ui diff alert
const alertVariants = cva(
- "relative w-full rounded-lg border",
+ "relative w-full pl-12 rounded-lg border"
)使用 CSS 变量或 Tailwind 颜色进行主题设置
您可以选择使用 CSS 变量或 Tailwind CSS 实用程序类进行主题设置。
当您添加新组件时,CLI 将根据您的components.json配置自动使用正确的主题方法。
Utility classes
<div className="bg-zinc-950 dark:bg-white" />要使用 utility classes 进行主题设置,在您的 components.json 文件中将 tailwind.cssVariables 设置为 false。
{
  "tailwind": {
    "config": "tailwind.config.js",
    "css": "app/globals.css",
    "baseColor": "slate",
    "cssVariables": false
  }
}CSS 变量
<div className="bg-background text-foreground" />要使用 CSS 变量类进行主题设置,在您的 components.json 文件中将 tailwind.cssVariables 设置为 true 。
{
  "tailwind": {
    "config": "tailwind.config.js",
    "css": "app/globals.css",
    "baseColor": "slate",
    "cssVariables": true
  }
}基础颜色
您现在可以为您的项目配置基础颜色。这将用于生成组件的默认颜色调色板。
{
  "tailwind": {
    "config": "tailwind.config.js",
    "css": "app/globals.css",
    "baseColor": "zinc",
    "cssVariables": false
  }
}在gray, neutral, slate, stone or zinc之间选择。
如果将 cssVariables 设置为 true,我们将在您的 globals.css 文件中将基础颜色设置为 cssVariables。如果将 cssVariables 设置为 false Tailwind CSS 实用程序类。
React Server Components
如果您使用的框架不支持 React Server Components 件,您现在可以通过将 rsc 设置为 false 来选择不使用。在添加组件时,我们将自动添加或删除 use client 指令。
{
  "rsc": false
}Styles
我们正在引入一个称为 _Style_的新概念。
_您可以将样式视为视觉基础:形状、图标、动画和排版。_一个样式带有其自己的组件、动画、图标等。
我们正在推出两种样式:default and new-york(更多样式即将推出)。

default 样式是您习惯使用的那种。这是我们自项目开始以来一直在使用的样式。它使用 lucide-react 作为图标,并使用 tailwindcss-animate 作为动画。
new-york样式是新样式。它带有更小的按钮、带有阴影的卡片和来自 Radix Icons 的新图标集。
当您运行 init 命令时,系统会询问您想使用哪种样式。这将保存在您的 components.json 文件中。
{
  "style": "new-york"
}主题
以样式为基础,然后使用 CSS 变量或 Tailwind CSS 实用程序类进行主题设置,彻底改变组件的外观

退出动画
我为所有组件添加了退出动画。单击下面的组合框以查看微妙的退出动画。
可以使用 utility class 自定义动画。
其他更新
Button
- 添加了一个新的按钮尺寸
icon
Sheet
- 将
position重命名为side以匹配其他元素。
- 移除了
size属性。使用className="w-[200px] md:w-[450px]"进行响应式尺寸调整。
更新您的项目
由于我们采用复制和粘贴的方法,您需要手动更新项目以获取最新更改。
Note: we are working on a diff command to help you
keep track of upstream updates.
添加 components.json
在根目录创建一个 components.json 文件:
{
  "style": "default",
  "rsc": true,
  "tailwind": {
    "config": "tailwind.config.js",
    "css": "app/globals.css",
    "baseColor": "slate",
    "cssVariables": true
  },
  "aliases": {
    "components": "@/components",
    "utils": "@/lib/utils"
  }
}更新 tailwind.css 和 aliases 的值以匹配您的项目结构。
Button
将 icon 尺寸添加到buttonVariants:
const buttonVariants = cva({
  variants: {
    size: {
      default: "h-10 px-4 py-2",
      sm: "h-9 rounded-md px-3",
      lg: "h-11 rounded-md px-8",
      icon: "h-10 w-10",
    },
  },
})Sheet
- 将
sheet.tsx的内容替换为以下内容:
"use client"

import * as React from "react"
import * as SheetPrimitive from "@radix-ui/react-dialog"
import { cva, type VariantProps } from "class-variance-authority"
import { X } from "lucide-react"

import { cn } from "@/lib/utils"

const Sheet = SheetPrimitive.Root

const SheetTrigger = SheetPrimitive.Trigger

const SheetClose = SheetPrimitive.Close

const SheetPortal = ({
  className,
  ...props
}: SheetPrimitive.DialogPortalProps) => (
  <SheetPrimitive.Portal className={cn(className)} {...props} />
)
SheetPortal.displayName = SheetPrimitive.Portal.displayName

const SheetOverlay = React.forwardRef<
  React.ElementRef<typeof SheetPrimitive.Overlay>,
  React.ComponentPropsWithoutRef<typeof SheetPrimitive.Overlay>
>(({ className, ...props }, ref) => (
  <SheetPrimitive.Overlay
    className={cn(
      "fixed inset-0 z-50 bg-background/80 backdrop-blur-sm data-[state=open]:animate-in data-[state=closed]:animate-out data-[state=closed]:fade-out-0 data-[state=open]:fade-in-0",
      className
    )}
    {...props}
    ref={ref}
  />
))
SheetOverlay.displayName = SheetPrimitive.Overlay.displayName

const sheetVariants = cva(
  "fixed z-50 gap-4 bg-background p-6 shadow-lg transition ease-in-out data-[state=open]:animate-in data-[state=closed]:animate-out data-[state=closed]:duration-300 data-[state=open]:duration-500",
  {
    variants: {
      side: {
        top: "inset-x-0 top-0 border-b data-[state=closed]:slide-out-to-top data-[state=open]:slide-in-from-top",
        bottom:
          "inset-x-0 bottom-0 border-t data-[state=closed]:slide-out-to-bottom data-[state=open]:slide-in-from-bottom",
        left: "inset-y-0 left-0 h-full w-3/4 border-r data-[state=closed]:slide-out-to-left data-[state=open]:slide-in-from-left sm:max-w-sm",
        right:
          "inset-y-0 right-0 h-full w-3/4  border-l data-[state=closed]:slide-out-to-right data-[state=open]:slide-in-from-right sm:max-w-sm",
      },
    },
    defaultVariants: {
      side: "right",
    },
  }
)

interface SheetContentProps
  extends React.ComponentPropsWithoutRef<typeof SheetPrimitive.Content>,
    VariantProps<typeof sheetVariants> {}

const SheetContent = React.forwardRef<
  React.ElementRef<typeof SheetPrimitive.Content>,
  SheetContentProps
>(({ side = "right", className, children, ...props }, ref) => (
  <SheetPortal>
    <SheetOverlay />
    <SheetPrimitive.Content
      ref={ref}
      className={cn(sheetVariants({ side }), className)}
      {...props}
    >
      {children}
      <SheetPrimitive.Close className="absolute right-4 top-4 rounded-sm opacity-70 ring-offset-background transition-opacity hover:opacity-100 focus:outline-none focus:ring-2 focus:ring-ring focus:ring-offset-2 disabled:pointer-events-none data-[state=open]:bg-secondary">
        <X className="h-4 w-4" />
        <span className="sr-only">Close</span>
      </SheetPrimitive.Close>
    </SheetPrimitive.Content>
  </SheetPortal>
))
SheetContent.displayName = SheetPrimitive.Content.displayName

const SheetHeader = ({
  className,
  ...props
}: React.HTMLAttributes<HTMLDivElement>) => (
  <div
    className={cn(
      "flex flex-col space-y-2 text-center sm:text-left",
      className
    )}
    {...props}
  />
)
SheetHeader.displayName = "SheetHeader"

const SheetFooter = ({
  className,
  ...props
}: React.HTMLAttributes<HTMLDivElement>) => (
  <div
    className={cn(
      "flex flex-col-reverse sm:flex-row sm:justify-end sm:space-x-2",
      className
    )}
    {...props}
  />
)
SheetFooter.displayName = "SheetFooter"

const SheetTitle = React.forwardRef<
  React.ElementRef<typeof SheetPrimitive.Title>,
  React.ComponentPropsWithoutRef<typeof SheetPrimitive.Title>
>(({ className, ...props }, ref) => (
  <SheetPrimitive.Title
    ref={ref}
    className={cn("text-lg font-semibold text-foreground", className)}
    {...props}
  />
))
SheetTitle.displayName = SheetPrimitive.Title.displayName

const SheetDescription = React.forwardRef<
  React.ElementRef<typeof SheetPrimitive.Description>,
  React.ComponentPropsWithoutRef<typeof SheetPrimitive.Description>
>(({ className, ...props }, ref) => (
  <SheetPrimitive.Description
    ref={ref}
    className={cn("text-sm text-muted-foreground", className)}
    {...props}
  />
))
SheetDescription.displayName = SheetPrimitive.Description.displayName

export {
  Sheet,
  SheetTrigger,
  SheetClose,
  SheetContent,
  SheetHeader,
  SheetFooter,
  SheetTitle,
  SheetDescription,
}- Rename
positiontoside
- <Sheet position="right" />
+ <Sheet side="right" />Thank you
我想感谢每一个使用这个项目、提供反馈以及为其做出贡献的人。我真的很感激。谢谢你们。


